
Supplies
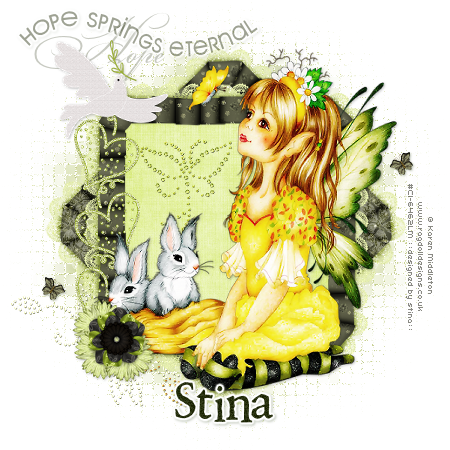
Scrap kit of choice - I am using "Joy of Hope" by Classie Creations which is available from Creative Scraps
Tube of choice - I am using the lovely artwork of Karen Middleton which can be purchased from CILM
**PLEASE DO NOT USE HER ARTWORK WITHOUT THE APPROPRIATE LICENCE**
WSL_Mask133 by Chelle from her blog
Fonts of choice - I am using Arriere Gard, Bickham Script Pro Regular and 2 Peas Renaissance
Plugin: Eye Candy 4000 Gradient Glow
~ Step 1 ~
Open a new 600 x 600 blank canvas flood-filled white
Paste Frame1 as new layer
Resize by 50%
Duplicate then Image / Rotate by 45 (left or right)
Resize by 50%
Duplicate then Image / Rotate by 45 (left or right)
Layers / Arrange / Move Down
Select the area inside the top Frame
Selections / Modify / Expand by 10
Selections / Modify / Expand by 10
Add a new raster layer
Layers / Arrange / Move Down
Layers / Arrange / Move Down
Paste Paper8 into Selection
Deselect
Deselect
Layers / Merge / Merge Down
~ Step 2 ~
Paste tube as new layer
Resize as necessary
Position to your liking
Duplicate
Resize as necessary
Position to your liking
Duplicate
On duplicate layer go to:
Effects / Plugins / Xero / Improver with default settings
Effects / Plugins / Xero / Improver with default settings
Effects / Plugins / Xero / Radiance with default settings
Lower the opacity to around 70 - 75
Layers / Merge / Merge Down
Add a drop shadow:
H & V - 1
Opacity - 30
Blur - 5.00
Colour - #000000
H & V - 1
Opacity - 30
Blur - 5.00
Colour - #000000
Paste BlingButterfly1 as new layer
Resize by 30%
Position to the left of tube
Resize by 30%
Position to the left of tube
Layers / Arrange / Move Down
Set blend mode to Multiply
Duplicate then
Layers / Merge / Merge Down
Duplicate then
Layers / Merge / Merge Down
Paste Dove as new layer
Resize by 25%
Position in upper left
Duplicate
Set blend mode to Multiply
Then lower opacity to 55
Layers / Merge / Merge Down
Resize by 25%
Position in upper left
Duplicate
Set blend mode to Multiply
Then lower opacity to 55
Layers / Merge / Merge Down
Add a drop shadow:
H & V - 1
Opacity - 30
Blur - 5.00
Colour - #000000
H & V - 1
Opacity - 30
Blur - 5.00
Colour - #000000
Paste Crystal Flower as new layer
Resize by 70%
Position to the left on bottom Frame
Move layers down so that the flower IS now between the top and bottom Frames
Resize by 70%
Position to the left on bottom Frame
Move layers down so that the flower IS now between the top and bottom Frames
Duplicate and resize by 70% again
Position slightly above flower along the Frame
Duplicate again then Image / Flip
Merge the duplicates
Layers / Arrange / Move Down
Then, Layers / Merge / Merge Down
Position slightly above flower along the Frame
Duplicate again then Image / Flip
Merge the duplicates
Layers / Arrange / Move Down
Then, Layers / Merge / Merge Down
It should now look like this:

Duplicate then Image / Mirror
Layers / Merge / Merge Down
Then set blend mode to Soft Light
Paste Heart1 as new layer
Resize by 23%
Image / Mirror
Place to the left, beneath the Dove layer, tucking the top behind the dove
Resize by 23%
Image / Mirror
Place to the left, beneath the Dove layer, tucking the top behind the dove
Duplicate then Image / Mirror
Place second Heart below first
Duplicate again
Image / Mirror once more
Place below second heart
Place second Heart below first
Duplicate again
Image / Mirror once more
Place below second heart
Layers / Merge / Merge Down
Repeat
Repeat
Paste Flower2 as new layer
Resize by 30%
Position in lower left
Resize by 30%
Position in lower left
Paste Sunflower1 as new layer
Resize by 20%
Layers / Arrange / Move Down
Position behind Flower1
Duplicate and move slightly around
Duplicate and move again
Resize by 20%
Layers / Arrange / Move Down
Position behind Flower1
Duplicate and move slightly around
Duplicate and move again
Add a drop shadow to each flower:
H & V - 1
Opacity - 30
Blur - 5.00
Colour - #000000
H & V - 1
Opacity - 30
Blur - 5.00
Colour - #000000
Layers / Merge / Merge Down
Repeat till all flowers are Merged
Repeat till all flowers are Merged
Paste Doodle1 (Butterfly) as new layer
Image / Rotate by 35 to the right
Resize by 8%
Position outside Frame
Duplicate then Image / Mirror
Image / Rotate by 35 to the right
Resize by 8%
Position outside Frame
Duplicate then Image / Mirror
Paste BlingFlower as new layer
Resize by 50%
Position in lower left
Layers / Arrange / Send to Bottom
Resize by 50%
Position in lower left
Layers / Arrange / Send to Bottom
Crop and resize
~ Step 3 ~
Activate Background layer
Add a new raster layer
Selections / Select All
Paste Paper5 into Selection
Deselect
Selections / Select All
Paste Paper5 into Selection
Deselect
Layers / New Mask Layer / From Image
Locate WSL_Mask133
OK
Layers / Merge / Merge Group
Locate WSL_Mask133
OK
Layers / Merge / Merge Group
Resize by 90%
Effects / Texture Effects / Mosaic - Antique with the following settings:

Lower the opacity of this layer to 60
Activate your top layer
Select your Pen Tool with these settings:

Now place your cursor/mouse where you wish to begin your text and click once
Move mouse over in a line and click once again
Continue in a line and click once
Move mouse over in a line and click once again
Continue in a line and click once

Right Click on node 1.
Node Type / Curve After
Click on the little arrow and pull up to make a hump on your line
Node Type / Curve After
Click on the little arrow and pull up to make a hump on your line
Right Click on node 3.
Node Type / Curve Before
Click on the little arrow and pull down to curve downward
Node Type / Curve Before
Click on the little arrow and pull down to curve downward
Select your Text Tool and choose your font
I am using Arriere Garde
Null your foreground and select your background a colour of your choice from your tube
I am using Arriere Garde
Null your foreground and select your background a colour of your choice from your tube
This works much like typing on an ellipse
Place your cursor over the line till you see the A with a curved line under it
Type in your text
I chose "Hope Springs Eternal" (a double meaning phrase in this case *s*)
Place your cursor over the line till you see the A with a curved line under it
Type in your text
I chose "Hope Springs Eternal" (a double meaning phrase in this case *s*)
Use your Mover Tool to move text to the left or right till you are satisfied with its position
In your Layer Palette open the Vector Layer and hide the curved line/path
Convert to raster layer
Convert to raster layer
Effects / Plugins / Eye Candy 4000 / Gradient Glow:
Glow width - 3.00
Soft Corners - 25
Opacity - 100
Setting - Fat
Colour - #FFFFFF
Glow width - 3.00
Soft Corners - 25
Opacity - 100
Setting - Fat
Colour - #FFFFFF
Add a slight drop shadow
Lower opacity to 45
I also added the word "Hope" in a script font, moved it to the layer beneath the dove and lowered the opacity to 25
Select another font of choice for your name
Objects / Align / Horizontal Centre in Canvas
Convert to raster layer etc.
Objects / Align / Horizontal Centre in Canvas
Convert to raster layer etc.
Finally, add your © copyright, licence and watermark
Save as GIF or JPG and you're done!
Thank you for trying my tutorial!
::st!na::
© Tutorial written by Stina on 26th March 2009
All rights reserved
Hello! :)
ReplyDeleteThank you formaking my artwork look so beautiful!!
~ Karen ~