

This tutorial is dedicated with love to Tracey of Soxsational Scraps (better known as Sox) and to Oopsie Daisy
as this tut n' tag was created with the charity scrap put together for Sox and the part I am using is Oopsie's
Both could use a friend right now - Tracey for personal reasons and Oopsie had a hardcore virus sweep through her entire TERRABYTE system....and wipe the lot. She has lost everything - her kits, her designs, everything. Today she informed us she was leaving the Designing world, but NONE of us at Exquisite would hear of it!
So Tracey and Lynette - this tutorial is for you
Supplies
Scrap kit of choice - I am using Oopsie Daisy's part in the "To Sox With Love" Charity Collab available exclusively at Exquisite Scraps
Two papers used are also in the collab though are Scraps by Jessica
Tubes of choice - I am using the gorjuss artwork of Suzanne Woolcott which can be purchased from her store
WSL_Mask214 by Chelle, available from her blog
Fonts of choice - I am using 2Peas Sunshine and LiorahBT
Plugin: Eye Candy 4000 Gradient Glow (optional)
~ Step 1 ~
Open a new 600 x 600 blank canvas flood-filled white
Paste odn-tswl-Frame2 as new layer
Resize by 15%
Resize by 15%
With your Magic Wand select the area inside the Frames
Selections / Modify / Expand by 10
Selections / Modify / Expand by 10
Activate Background layer
Paste SSK_paper6_JD as new layer
Resize by 50%
Paste SSK_paper6_JD as new layer
Resize by 50%
Selections / Invert
Delete and deselect
Delete and deselect
~ Step 2 ~
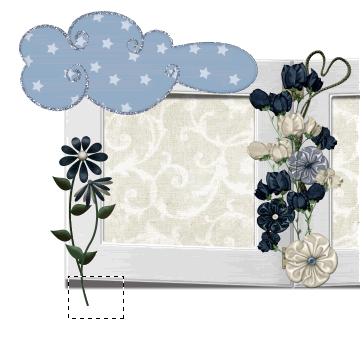
Paste odn-tswl-cloud as new layer
Resize by 12%
Position in upper left
Resize by 12%
Position in upper left
Paste odn-tswl-floral6 as new layer
Resize by 8%
Position in lower left
Resize by 8%
Position in lower left
Paste odn-tswl-flora7 as new layer
Resize by 8%
Position alongside other flower on the left
Move slightly down
Use your Selection Tool to draw a selection around the bottom part of the stem
Delete and deselect
Resize by 8%
Position alongside other flower on the left
Move slightly down
Use your Selection Tool to draw a selection around the bottom part of the stem
Delete and deselect
Layers / Merge / Merge Down
Duplicate
Image / Mirror
Image / Mirror
Paste odn-tswl-envelope as new layer
Image / Rotate by 20 to the left
Resize by 5%
Position in lower right
Image / Rotate by 20 to the left
Resize by 5%
Position in lower right
Paste odn-tswl-heart as new layer
Resize by 5%
Image / Mirror
Position over the bottom part of the envelope in lower right
Resize by 5%
Image / Mirror
Position over the bottom part of the envelope in lower right
Activate the Frame layer
Paste odn-tswl-knottedribbon as new layer
Resize by 13%
Position with the edge that is visible along the edge of the Frame
Resize by 13%
Position with the edge that is visible along the edge of the Frame
Paste odn-tswl-floral5 as new layer
Resize by 5%
Position OVER the flower in the centre of the Frame above the ribbon
Resize by 5%
Position OVER the flower in the centre of the Frame above the ribbon
Paste odn-tswl-swirlbling2 as new layer
Resize by 15%
Position in lower left corner
Resize by 15%
Position in lower left corner
Layers / Arrange / Send to Bottom
Duplicate
Image / Mirror
Layers / Merge / Merge Down
Image / Mirror
Layers / Merge / Merge Down
Activate top layer
Paste odn-tswl-glitterborder as new layer
Resize by 14%
Position along the bottom with the ends protruding slightly
Duplicate
Image / Mirror
Layers / Merge / Merge Down
Position to your liking
Paste odn-tswl-glitterborder as new layer
Resize by 14%
Position along the bottom with the ends protruding slightly
Duplicate
Image / Mirror
Layers / Merge / Merge Down
Position to your liking
Duplicate again
Image / Flip
Place in position
Layers / Merge / Merge Down
Image / Flip
Place in position
Layers / Merge / Merge Down
Lower the opacity to 50
~ Step 3 ~
Activate your Frame layer again
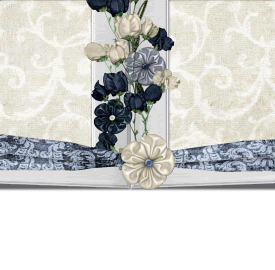
Paste one of your tubes of choice as a new layer
Resize as necessary
Position in the left Frame
Layers / Arrange / Move Up
Resize as necessary
Position in the left Frame
Layers / Arrange / Move Up
Your tube should now be above cloud but still below the ribbon
Repeat steps with second tube in the right Frame
With your Magic Wand select inside your Frames again
Selections / Modify / Expand by 2
Selections / Invert
Selections / Modify / Feather by 2
Selections / Modify / Expand by 2
Selections / Invert
Selections / Modify / Feather by 2
Activate one of your tubes
With your Eraser Tool carefully erase the excess tube beneath the ribbon that falls below the Frame
With your Eraser Tool carefully erase the excess tube beneath the ribbon that falls below the Frame
STILL SELECTED activate the other tube and repeat
Deselect

Activate Background layer
Paste SSK_paper5_JD as new layer
Layers / New Mask Layer / From Image
Locate WSL_Mask214
OK
Layers / Merge / Merge Group
Lower opacity to 30
Layers / New Mask Layer / From Image
Locate WSL_Mask214
OK
Layers / Merge / Merge Group
Lower opacity to 30
Select your Text Tool and two fonts of choice
I am using 2Peas Sunshine for the print and LiorahBT for the script
Choose a colour from your tube
I am using 2Peas Sunshine for the print and LiorahBT for the script
Choose a colour from your tube
Foreground - null
Background - #64737b
Background - #64737b
Type out the words "Friends weather Life's Storms" in print
And "Together" in script
Convert each to raster layer separately so you can move each around to your liking
And "Together" in script
Convert each to raster layer separately so you can move each around to your liking
Duplicate the word "Together"
Move it somewhere to your liking
Lower the opacity to about 12
Move it somewhere to your liking
Lower the opacity to about 12
Add a drop shadow:
H & V - 1
Opacity - 30
Blur - 3.00
Colour - #64737b
H & V - 1
Opacity - 30
Blur - 3.00
Colour - #64737b
Apply this same drop shadow to your elements
Select your Text Tool again with the same colours
Choose your font (or use the same one)
Type out your name
Objects / Align / Horizontal Centre in Canvas
Convert to raster layer
Choose your font (or use the same one)
Type out your name
Objects / Align / Horizontal Centre in Canvas
Convert to raster layer
Add any effects you wish (I used some noise and a Gradient Glow)
Apply the same drop shadow as above
Apply the same drop shadow as above
Finally, add your © copyright, licence and watermark
Then save as a GIF or JPG and you're done!
Thank you for trying my tutorial!
::st!na::
© Tutorial written by Stina on 20th March 2009
All rights reserved
Stina, thank you so much. You are truly an incredible person with such a beautiful heart and I luvs you to pieces. *hugs*
ReplyDelete