
Supplies
"Cherry Love" scrap kit by Seachell Scrapz which is a freebie available on her blog
Tube of choice - I am using the lovely work of Caron Vinson which can be purchased from CILM
**PLEASE DO NOT USE HER ARTWORK WITHOUT THE APPROPRIATE LICENCE**
WSL_Mask133 by Chelle (supplied)
Fonts of choice - I am using Albemarle Swash (supplied), 2Peas Frazzled (pay to use) and GeeohHmk (supplied)
Plugin: Xero / Soft Mood (supplied)
Plugin: Eye Candy 4000 Gradient Glow (optional)
My Supplies here
~ Step 1 ~
Open a new 600 x 600 blank canvas flood-filled white
Paste Element17 (Frame) as new layer
Resize by 75%
Paste Element14 (Frame) as new layer
Resize by 75%
Position centrally over first frame
Resize by 75%
Paste Element14 (Frame) as new layer
Resize by 75%
Position centrally over first frame
Add a drop shadow to top frame
H & V – 1
Opacity – 50
Blur – 5.00
Colour - #000000
Repeat Drop Shadow changing the H & V to -1
Layers / Merge / Merge Down
H & V – 1
Opacity – 50
Blur – 5.00
Colour - #000000
Repeat Drop Shadow changing the H & V to -1
Layers / Merge / Merge Down
With your Magic Wand click inside the frame
Selections / Modify / Expand by 15
Add a new raster layer
Layers / Arrange / Move Down
Copy Paper2 and Paste into Selection
Selections / Modify / Expand by 15
Add a new raster layer
Layers / Arrange / Move Down
Copy Paper2 and Paste into Selection
KEEP SELECTED
Open your tube and paste as new layer
Resize larger is necessary
Position in frame
Selections / Invert
Delete
Resize larger is necessary
Position in frame
Selections / Invert
Delete
Set blend mode of layer to Soft Light
~ Step 2 ~
Paste your new as new layer once again
Position to the right (or left – depending on the tube you use)
Then click inside the Frame with your Magic Wand again
Selections / Modify / Expand by 8
Selections / Invert
Selections / Modify / Feather by 2
Then using your Eraser carefully erase along the bottom of the tube where it meets the Frame
Deselect
Duplicate layer and set blend mode to Multiply
Lower opacity to 50
Lower opacity to 50
Still on same layer
Effects / Plugins / Xero / Soft Mood with default settings
Effects / Plugins / Xero / Soft Mood with default settings
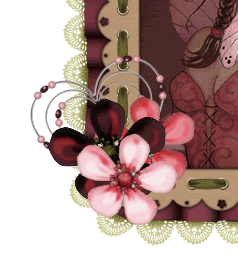
Paste Element2 (Dark Flower) as new layer
Resize by 35%
Position to the lower left of the Frame
Resize by 35%
Position to the lower left of the Frame
Paste Element3 (Light Pink Flower) as new layer
Resize by 30%
Position alongside first flower
Resize by 30%
Position alongside first flower
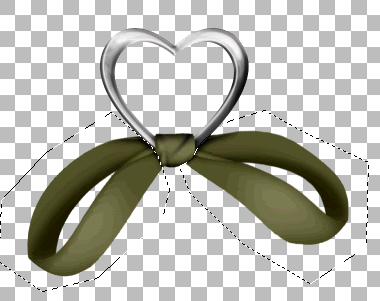
Paste Element5 (Beaded Heart) as new layer
Image / Rotate by 20 to the left
Resize by 35%
Position behind flowers to the left
Image / Rotate by 20 to the left
Resize by 35%
Position behind flowers to the left
Open Element22 and duplicate it (Shift D), and close off original
Using your Freehand Tool draw around the Ribbon on either side
Press delete
Using your Freehand Tool draw around the Ribbon on either side
Press delete
Now your heart should look like this:
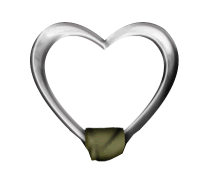
Paste it as a new layer to your working canvas
Resize by 30%
Position over the centre of the Green bow in the lower right of the Frame
Resize by 30%
Position over the centre of the Green bow in the lower right of the Frame
Paste Element11 (Burgundy bow) as new layer
Image / Mirror
Resize by 40%
Position in the upper left corner
Image / Mirror
Resize by 40%
Position in the upper left corner
~ Step 3 ~
Activate your Background layer
Paste Paper4 as new layer
Resize by 70%
Layers / Load/Save Mask / Load Mask from Disk
Locate WSL_Mask133
Source Luminance
Fit to Layer
OK
Layers / Merge / Merge Group
Lower opacity to 40
Paste Paper4 as new layer
Resize by 70%
Layers / Load/Save Mask / Load Mask from Disk
Locate WSL_Mask133
Source Luminance
Fit to Layer
OK
Layers / Merge / Merge Group
Lower opacity to 40
Effects / Texture Effects / Fine Leather with the following settings:
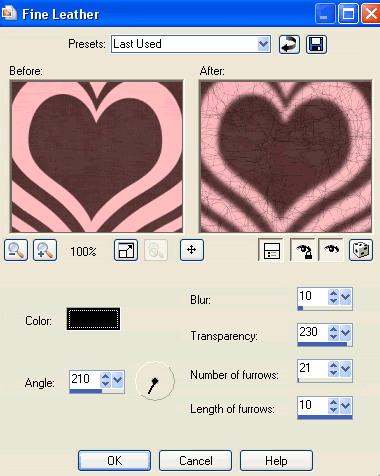
Repeat Fine Leather
Effects / Distortion Effects / Curlicues with default settings
Crop and resize
~ Step 4 ~
Choose two colours from your tube and/or scrap kit and set them as your Background and foreground colours in your Materials Palette
Foreground - #d28184
Background - #341215
Background - #341215
Turn your foreground off to null for the moment and type out the words:
"It's All About" or "Love My"
"It's All About" or "Love My"
Now turn the visibility back on the Foreground and toggle the colours so they are now the other way around
Foreground - #341215
Background - #d28184
Foreground - #341215
Background - #d28184
Choose another font slightly bolder (but not too much, though it is entirely up to you) and type the word:
"Attitude"
"Attitude"
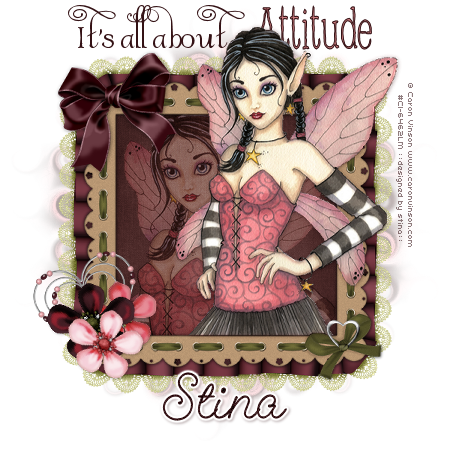
Your text should now read "It's All About Attitude" or "Love My Attitude"
Change to another font, or one of those you have already used, and type out your name
Add any effects you wish to make your name stand out
Then apply a slight drop shadow
Add any effects you wish to make your name stand out
Then apply a slight drop shadow
Finally add your © copyright, licence and watermark
Then save as a GIF or JPG and you're done!
Then save as a GIF or JPG and you're done!
Thanks for trying my tutorial
::st!na::
©Tutorial written by Stina on 8th March 2009
All rights reserved
Thanks for such a great tut! It was well explained and easy to follow!
ReplyDeleteGreat tut, being thick though how do I send you anyhting I create using your tuts? :oP
ReplyDelete