

Supplies
Scrap kit of choice - I am using "Rapunzel" by Lynn of Moo Designs available from The Scrappin Divaz Designz
Tube of choice - I am using the lovely artwork of Zindy Nielsen, a free tube available from her site
Fonts of choice - I am using Centime and 2Peas Typo
Plugins: Mura Meister Copies and Xenofex Constellation
Ready? Let's begin...
Open a new 600 x 600 blank canvas flood-filled white
Paste CircleFrame as new layer
Resize by 20%
Duplicate, then set blend mode to Soft Light
Layers > Merge > Merge Down
Resize by 20%
Duplicate, then set blend mode to Soft Light
Layers > Merge > Merge Down
Select Change to Target brush
Se your Properties and settings to the following:
Se your Properties and settings to the following:
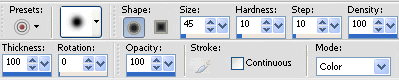
In your Materials Palette set your Foreground to a colour that will match your tube
I used #693945
I used #693945
Carefully colour in the frame with your brush
You will see it change tone and colour
You will see it change tone and colour

Select inside Frame with Magic Wand
Selections > Modify > Expand by 10
Add new raster layer
Paste paper of choice INTO selection
Layers > Arrange > Move Down
Selections > Modify > Expand by 10
Add new raster layer
Paste paper of choice INTO selection
Layers > Arrange > Move Down
KEEP SELECTED!!
Paste Tube of choice as new layer
Resize as necessary
Selections > Invert
Delete then deselect
Resize as necessary
Selections > Invert
Delete then deselect
Paste FancyWrap as new layer
Resize by 12%
Position along bottom of Frame
Resize by 12%
Position along bottom of Frame
Select the area outside of Frame with Magic Wand
Selections > Modify > Feather by 2
Activate Wrap layer and delete
Deselect
Selections > Modify > Feather by 2
Activate Wrap layer and delete
Deselect
Paste LaceFlowers as new layer
Image > Rotate by 90 to the right
Resize by 23%
Layers > Arrange > Move Down
Position to the right below the Wrap
Image > Rotate by 90 to the right
Resize by 23%
Layers > Arrange > Move Down
Position to the right below the Wrap
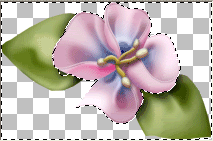
Paste Flower as new layer
Resize by 5%
Position on one of the Lace Flowers
Duplicate several times, Mirror and Flipping each to your liking
Resize by 5%
Position on one of the Lace Flowers
Duplicate several times, Mirror and Flipping each to your liking

Paste Flower01 and Flower02 as new layers
Resize each by 10%
Image > Mirror one and position at the end of the Wrap
Position the other toward the bottom of Frame
Resize each by 10%
Image > Mirror one and position at the end of the Wrap
Position the other toward the bottom of Frame
Duplicate both, then
Use your Magic Wand to select the LEAVES only
Selections > Modify > Feather by 2
Press delete a few times to remove all trace of the Leaves
Deselect
Use your Magic Wand to select the LEAVES only
Selections > Modify > Feather by 2
Press delete a few times to remove all trace of the Leaves
Deselect
Position the flowers to your liking
Paste Vine as new layer
Resize by 15%
Position to the right and move below flower layers
Lower the opacity to 60
Resize by 15%
Position to the right and move below flower layers
Lower the opacity to 60

Paste Ladder as new layer
Resize by 12% and position tucked behind flowers
Resize by 12% and position tucked behind flowers
Paste HeartRope as new layer
Image > Rotate by 15 to the right
Resize by 10%
Position in upper left and partially tucked behing the Wrap
Lower opacity to 70
Image > Rotate by 15 to the right
Resize by 10%
Position in upper left and partially tucked behing the Wrap
Lower opacity to 70
Paste StarTrail as new layer
Resize by 12% and position below Wrap
Resize by 12% and position below Wrap
Paste Flower02 as NEW IMAGE
Resize by 15%
Use your Magic Wand to select the leaves and excess area around flower
Resize by 15%
Use your Magic Wand to select the leaves and excess area around flower
Selections > Modify > Feather by 2
Press delete a few times to remove all trace of the leaves
Press delete a few times to remove all trace of the leaves
Paste as new layer on your working canvas
LEAVE IN POSITION
Effects > Plugins > Mura Meister > Copies with the following settings:
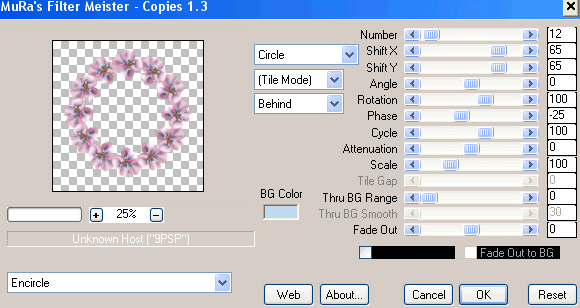
Layers > Arrange > Send to Bottom
Resize to 450 x 450 Bicubic resample
Image > Canvas Resize to 500 x 500 centred
Image > Canvas Resize to 500 x 500 centred
Duplicate Encircled Flowers
On the bottom copy, go to
On the bottom copy, go to
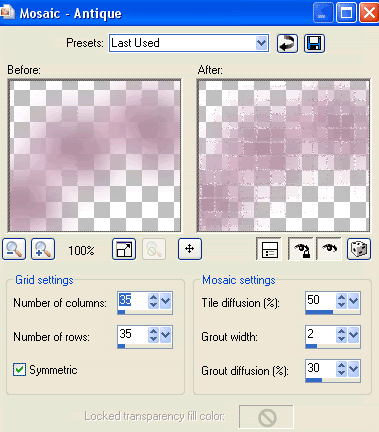
Effects > Texture Effects > Mosaic Antique with the following settings:
Select your Preset Shape Tool and set it to Ellipse
Set your Foreground to a dark colour and your background NULL
Set your Foreground to a dark colour and your background NULL
Hold Shift and draw out a circle around your Frame
Objects > Align > Centre in Canvas
Objects > Align > Centre in Canvas
Select your Text Tool and font of choice
I am using Centime
Text colour to match your tag - I am using #884e79
I am using Centime
Text colour to match your tag - I am using #884e79
On the curve type out your Text and position to liking
Open Vector Layer in Layer Palette and hide the Ellipse
Convert to raster layer
Lower opacity to 35
Open Vector Layer in Layer Palette and hide the Ellipse
Convert to raster layer
Lower opacity to 35
Type out your name using the same or different font of choice
I am using 2Peas Typo
Objects > Align > Horizontal Centre in Canvas
Convert to raster layer
Apply any effects and drop shadow of your choice
I am using 2Peas Typo
Objects > Align > Horizontal Centre in Canvas
Convert to raster layer
Apply any effects and drop shadow of your choice
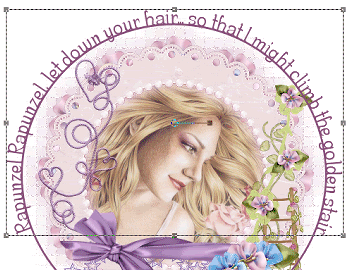
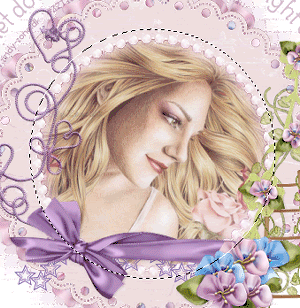
Finally, add your © copyright, licence and watermark, then save as a GIF or JPG and you're done!
** IF YOU WISH TO ANIMATE PLEASE FOLLOW THESE NEXT STEPS **
Activate your Frame Layer
Duplicate twice ad rename Sparkle1, Sparkle2 and Sparkle3
With your Selection Tool on Ellipse draw out a circle around the inner Frame
** IF YOU WISH TO ANIMATE PLEASE FOLLOW THESE NEXT STEPS **
Activate your Frame Layer
Duplicate twice ad rename Sparkle1, Sparkle2 and Sparkle3
With your Selection Tool on Ellipse draw out a circle around the inner Frame
Hide Sparkle2 and Sparkle3 leaving only Sparkle1 visible
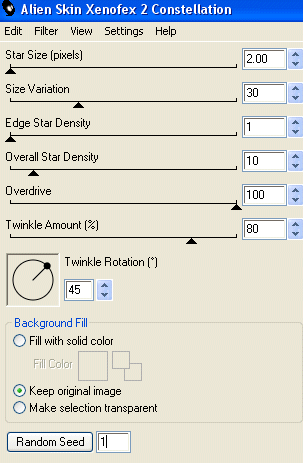
Effects > Plugins > Xenofex 2 > Constellation with the following settings:
Effects > Plugins > Xenofex 2 > Constellation with the following settings:
Hide Sparkle1 and activate Sparkle2
Apply the Constellation effect, adjusting the Random Seed
Hide Sparkle2 and activate Sparkle3
Apply the Constellation effect again, adjusting the Random Seed once more
Now for the animation part!
Hide Sparkle2 and Sparkle with only Sparkle1 visible
Edit > Copy Merged
Open Animation Shop
Edit > Paste as New Animation
Back to PSP
Hide Sparkle1 and activate Sparkle2
Edit > Copy Merged
In Animation Shop
Edit > Paste AFTER Current Frame
Back to PSP
Hide Sparkle2 and activate Sparkle3
Edit > Copy Merged
In Animation Shop
Edit > Paste AFTER Current Frame
Now save as a GIF and you're done!
Thanks for trying my tutorial!
::st!na::
Here is a non-animated version:
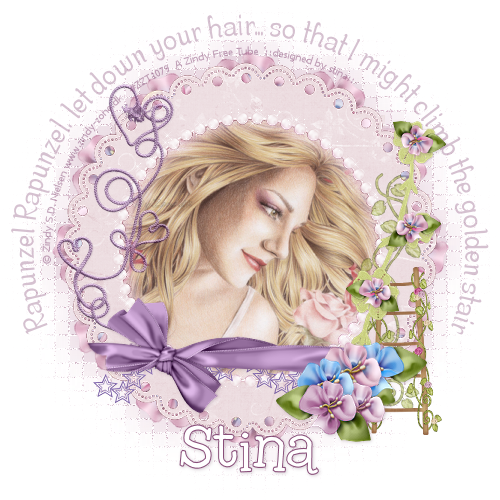
© Tutorial written by Stina on 31st May 2009
All rights reserved
All rights reserved
Beautiful tutorial hun and I applaud you for always being copyright compliant.
ReplyDeleteAnyone who says otherwise is quite clearly just jealous of you and your fabulous tuts *hugs*
Julie
Hello there dear friend.
ReplyDeleteI come here everyday to see your beautiful work.
And your beautiful work that you share with thousand around the world. I applaud you for all that you do and give to others. In your work, we can see the beautiful heart you have for others.
Please no that you are so appreciaited for what you do here. Never give up on the words of one.
Please take care.
Love and Hugs to you from the PUP