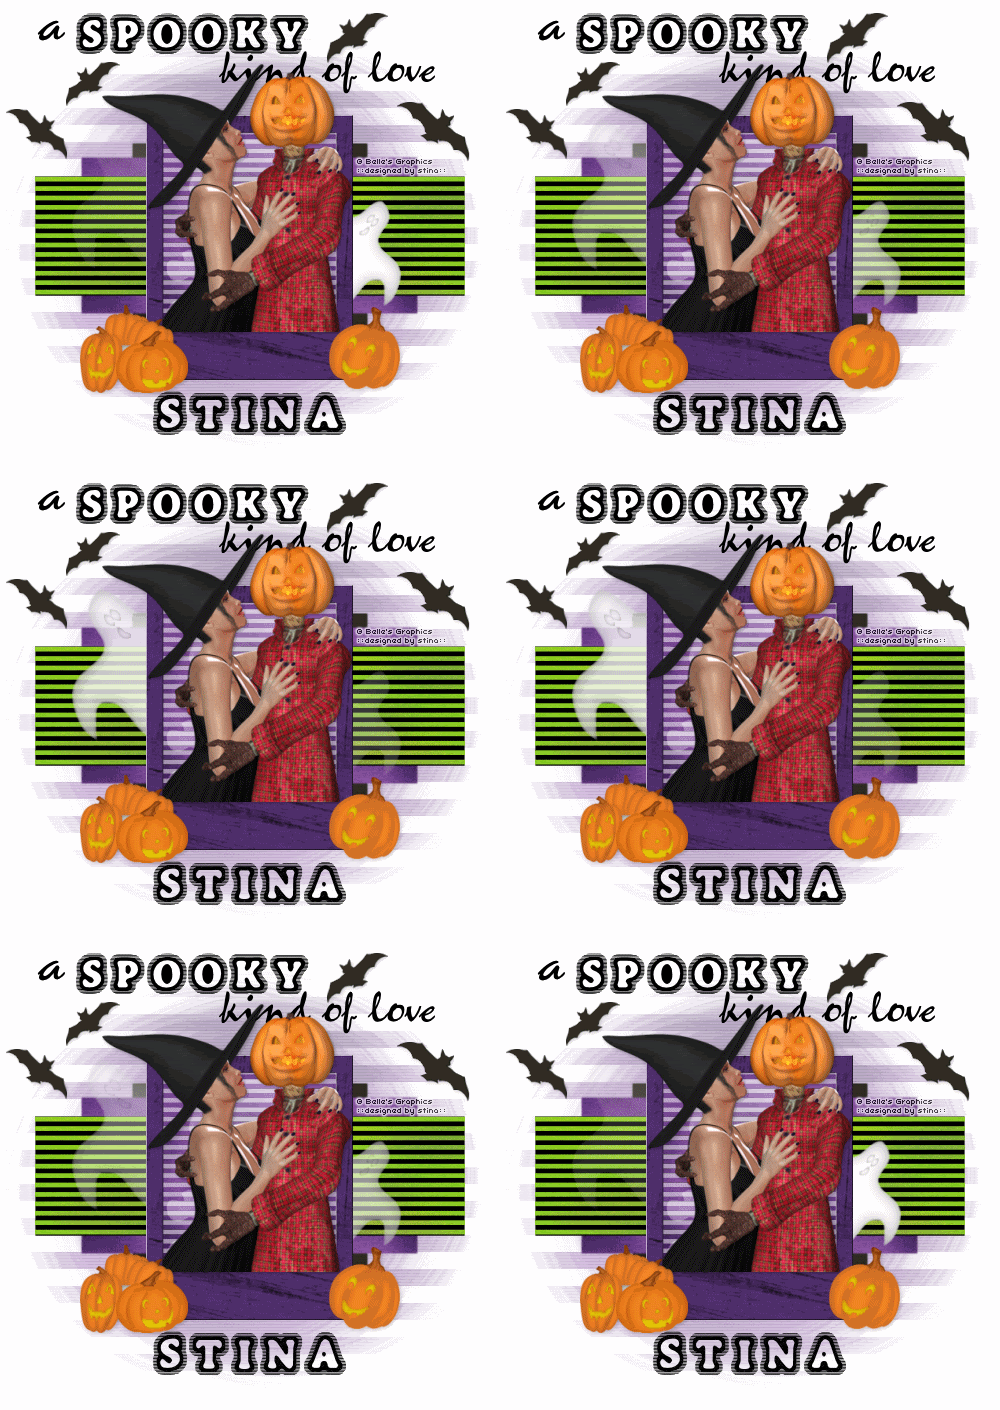
Supplies
Scrap kit of choice - I am using "Spookylicious" by Digiscrapations available from Twilight Scraps
Tube of choice - I am using the poser artwork of Belle's Graphics which is FTU and available through her Yahoo Group
Template 86 by Kristin available from her blog
vaybs_mask_050805 by Vaby here
Fonts of choice - I am using BoneHymie and Borealis
Plugins: dbs Flux > Linear Transmission
PhotoEffex > Scanlines
Let's begin...
Open Template 86 by Kristin
Shift D to duplicate then close off original
Delete copyright layer
Image > Canvas Resize 700 x 600 centred
Select RECTANGLE1 with your Magic Wand
Selections > Modify > Feather by 2
Paste Paper of choice INTO Selection
Deselect
Select RECTANGLE2 with your Magic Wand
Repeat above step
Now activate RECTANGLE3
This time select the greyed area of this layer ONLY until each one has been selected
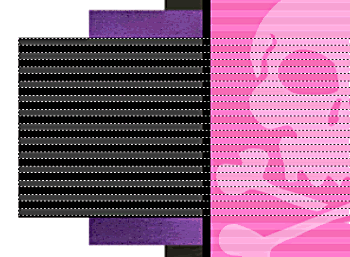
Paste Paper of choice INTO selection
Then deselect
Activate FRAME BACK
Select the Lighter Pink with your Magic Wand as you did with RECTANGLE3
Once they are all selected activate your Background layer, then
Layers > Promote Selection to Layer
KEEP SELECTED!!
Move the promoted layer up to the layer BELOW your FRAME BACK
Activate FRAME BACK AGAIN, then press delete
STILL SELECTED!!
You should now see white lines through the FRAME BACK
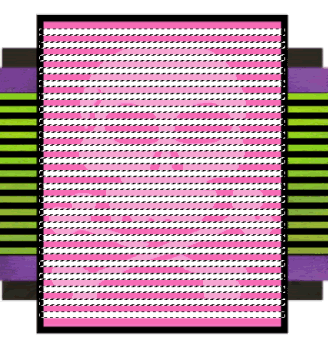
Activcate your White layer below
Add new raster layer
Now paste paper of choice INTO selection
Then deselect
Lower opacity to 50
Layers > Merge > Merge Down
Activate FRAME BACK again
Now select the darker pink areas till all are selected
Paste SAME Paper INTO selection
Deselect
Paste Frame as new layer
Resize by 50%
Move down slightly to position
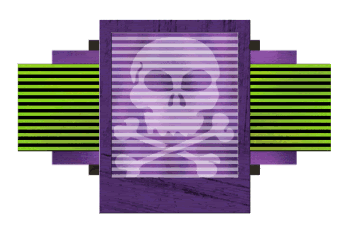
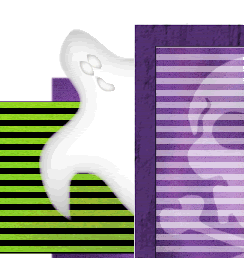
You should now have something like this:
Paste a couple of Pumpkins of choice as new layers
Resize by 20 - 30% and position to liking
Paste a Bat as new layer
Resize by 20%
Duplicate and position
Paste a Ghost as new layer
Resize by 60%
Position behind FRAME BACK layers
Paste Tube of choice as new layer
Resize as necessary and position
Use your Selection Tool to make a selection around the bottom of your Tube along the edge of the Frame
Delete then deselect
Paste Paper of choice as new layer
Layers > Arrange > Send to Bottom
Layers > New Mask Layer > From Image
Apply vaybs_mask_050805
OK
Layers > Merge > Merge Group
Crop and resize
Still on Mask Layer
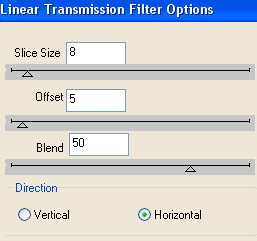
Effects > Plugins > dsb Flux > Linear Transmission with the following settings:
Then,
Effects > Plugins > PhotoEffx > Scanlines with default settings
Select Text Tool and fonts of choice
I am using BoneHymie and Borealis
Text colour is Black
Type out your text of choice and position to liking
Best to type each "line" as separate vectors and then convert each layer to raster - that way you can move them around and position to liking
Apply any effects and drop shadow of choice
Select another font of choice
I am using BoneHymie (this is such a cute font..lol)
Objects > Align > Horizontal Centre in Canvas
Convert to raster layer
Apply any effect and drop shadow of choice
Finally, add your © copyright, licence and watermark, then save as a GIF or JPG and you're done!
** IF YOU WISH TO ANIMATE PLEASE FOLLOW THESE NEXT STEPS **
Activate your Ghost layers
Name them Ghost1 and Ghost2
Lower the opacity of Ghost1 to 0
Edit > Copy Merged
Open Animation Shop
Edit > Paste as New Animation
Back to PSP
Change the opacity of Ghost1 to 20 and Ghost2 to 80
Edit > Copy Merged
Open Animation Shop
Edit > Paste as New Animation
Back to PSP
Change the opacity of Ghost1 to 40 and Ghost2 to 60
Edit > Copy Merged
Open Animation Shop
Edit > Paste as New Animation
Back to PSP
Change the opacity of Ghost1 to 60 and Ghost2 to 40
Edit > Copy Merged
Open Animation Shop
Edit > Paste as New Animation
Back to PSP
Change the opacity of Ghost1 to 80 and Ghost2 to 20
Edit > Copy Merged
Open Animation Shop
Edit > Paste as New Animation
Back to PSP
Change the opacity of Ghost1 to 100 and Ghost2 to 0
Edit > Copy Merged
Open Animation Shop
Edit > Paste as New Animation
You should now have 6 Frames
Select All, copy and then paste as a new animation
Select All again, then Animation > Reverse Frames
Select All and copy
Activate last Frame of original Animation
Edit > Paste AFTER Current Frame
You should now have 12 Frames
Select all and change Frame Properties to 20
Now save as a GIF and you're done!
Thanks for trying my tutorial!
::st!na::
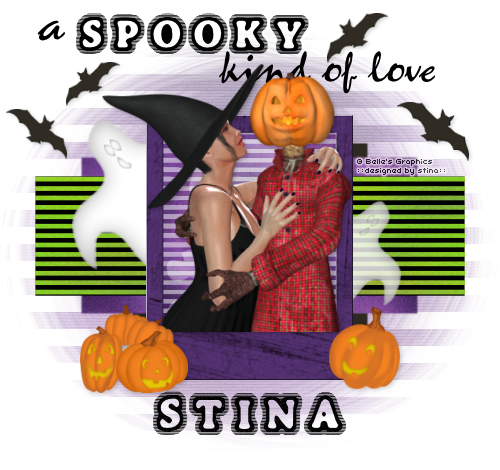
Here is a non-animated version:
© Tutorial written by Stina on 13th September 2009
All rights reserved
Fonts of choice - I am using BoneHymie and Borealis
Plugins: dbs Flux > Linear Transmission
PhotoEffex > Scanlines
Let's begin...
Open Template 86 by Kristin
Shift D to duplicate then close off original
Delete copyright layer
Image > Canvas Resize 700 x 600 centred
Select RECTANGLE1 with your Magic Wand
Selections > Modify > Feather by 2
Paste Paper of choice INTO Selection
Deselect
Select RECTANGLE2 with your Magic Wand
Repeat above step
Now activate RECTANGLE3
This time select the greyed area of this layer ONLY until each one has been selected

Paste Paper of choice INTO selection
Then deselect
Activate FRAME BACK
Select the Lighter Pink with your Magic Wand as you did with RECTANGLE3
Once they are all selected activate your Background layer, then
Layers > Promote Selection to Layer
KEEP SELECTED!!
Move the promoted layer up to the layer BELOW your FRAME BACK
Activate FRAME BACK AGAIN, then press delete
STILL SELECTED!!
You should now see white lines through the FRAME BACK

Activcate your White layer below
Add new raster layer
Now paste paper of choice INTO selection
Then deselect
Lower opacity to 50
Layers > Merge > Merge Down
Activate FRAME BACK again
Now select the darker pink areas till all are selected
Paste SAME Paper INTO selection
Deselect
Paste Frame as new layer
Resize by 50%
Move down slightly to position
You should now have something like this:

Paste a couple of Pumpkins of choice as new layers
Resize by 20 - 30% and position to liking
Paste a Bat as new layer
Resize by 20%
Duplicate and position
Paste a Ghost as new layer
Resize by 60%
Position behind FRAME BACK layers

Paste Tube of choice as new layer
Resize as necessary and position
Use your Selection Tool to make a selection around the bottom of your Tube along the edge of the Frame
Delete then deselect
Paste Paper of choice as new layer
Layers > Arrange > Send to Bottom
Layers > New Mask Layer > From Image
Apply vaybs_mask_050805
OK
Layers > Merge > Merge Group
Crop and resize
Still on Mask Layer
Effects > Plugins > dsb Flux > Linear Transmission with the following settings:

Then,
Effects > Plugins > PhotoEffx > Scanlines with default settings
Select Text Tool and fonts of choice
I am using BoneHymie and Borealis
Text colour is Black
Type out your text of choice and position to liking
Best to type each "line" as separate vectors and then convert each layer to raster - that way you can move them around and position to liking
Apply any effects and drop shadow of choice
Select another font of choice
I am using BoneHymie (this is such a cute font..lol)
Objects > Align > Horizontal Centre in Canvas
Convert to raster layer
Apply any effect and drop shadow of choice
Finally, add your © copyright, licence and watermark, then save as a GIF or JPG and you're done!
** IF YOU WISH TO ANIMATE PLEASE FOLLOW THESE NEXT STEPS **
Activate your Ghost layers
Name them Ghost1 and Ghost2
Lower the opacity of Ghost1 to 0
Edit > Copy Merged
Open Animation Shop
Edit > Paste as New Animation
Back to PSP
Change the opacity of Ghost1 to 20 and Ghost2 to 80
Edit > Copy Merged
Open Animation Shop
Edit > Paste as New Animation
Back to PSP
Change the opacity of Ghost1 to 40 and Ghost2 to 60
Edit > Copy Merged
Open Animation Shop
Edit > Paste as New Animation
Back to PSP
Change the opacity of Ghost1 to 60 and Ghost2 to 40
Edit > Copy Merged
Open Animation Shop
Edit > Paste as New Animation
Back to PSP
Change the opacity of Ghost1 to 80 and Ghost2 to 20
Edit > Copy Merged
Open Animation Shop
Edit > Paste as New Animation
Back to PSP
Change the opacity of Ghost1 to 100 and Ghost2 to 0
Edit > Copy Merged
Open Animation Shop
Edit > Paste as New Animation
You should now have 6 Frames
Select All, copy and then paste as a new animation
Select All again, then Animation > Reverse Frames
Select All and copy
Activate last Frame of original Animation
Edit > Paste AFTER Current Frame
You should now have 12 Frames
Select all and change Frame Properties to 20
Now save as a GIF and you're done!
Thanks for trying my tutorial!
::st!na::
Here is a non-animated version:

© Tutorial written by Stina on 13th September 2009
All rights reserved

No comments:
Post a Comment