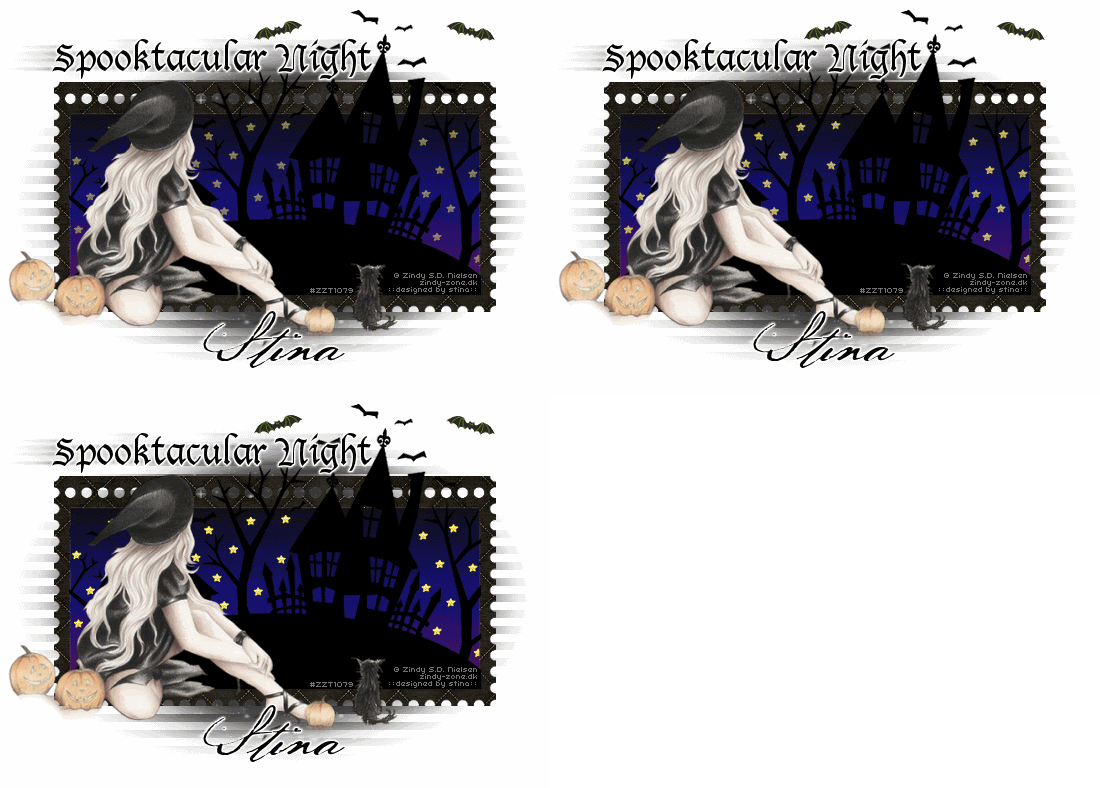
Supplies
Scrap kit of choice - I am using "Spookylicious" by Sevens Scraps available from Twilight Scraps
Tube of choice - I am using one of the FTU tubes using the artwork of Zindy Nielsen
DBC_Mask_02 here
Fonts of choice - I am using Lucida Blackletter and Liorah BT
Plugins: Xero > Improver and Radiance
dsb Flux > Linear Transmission
Let's begin...
Open a new 600 x 450 blank canvas flood-filled white
Paste Frame1 as new layer
Resize by 70%
Select inside the Frame with your Magic Wand
Selections > Modify > Expand by 10
Paste Paper of choice as new layer
Resize by 70%
Adjust > Blur > Gaussian Blur with a Radius of 10.00
Selections > Invert
Delete
Layers > Arrange > Move Down
KEEP SELECTED!!
Add a new raster layer
Open your Material Properties and select Gradient
Locate NGBlackBlue Gradient
Invert CHECKED
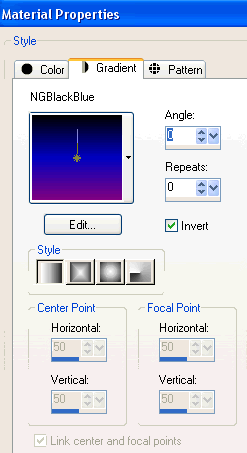
Flood fill layer with Gradient
Deselect
Lower opacity to around 55
Layers > Merge > Merge Down
Activate top layer
Paste SpookyHouse as new layer
Resize by 80% and position
Select inside of Frame once more
Selections > Invert
Use your Eraser to erase the excess from sides and bottom (leave top overhanging)
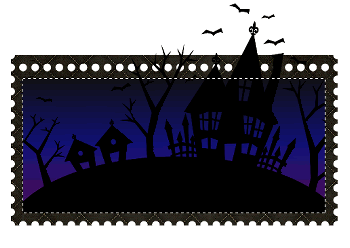
Deselect
Paste Moon as new layer
Resize by 20%
Position somewhere in the sky to your liking
Paste Star as new layer
Resize by 5%
Duplicate as many times as you like and scatter about the sky
Once you are happy with your amount, close off ALL layers EXCEPT for the Stars, then
Layers > Merge > Merge Visible
Unhide layers again
Paste Bat as new layer
Image > Rotate by 20 to the left
Resize by 12%
Dupliate, then Image > Mirror
Position above Frame to liking
Paste Tube of choice as new layer
Resize as necessary and position
Effects > Plugins > Xero > Improver with default settings
Duplicate
Effects > Plugins > Xero > Radiance with default settings
Lower opacity to around 25
Layers > Merge > Merge Down
Add new raster layer
Layers > Arrange > Send to Bottom
Flood fill black
Layers > New Mask Layer > From Image
Apply DBV_Mask_02
OK
Layers > Merge > Merge Group
Resize by 85%
Effects > Plugins > dsb Flux > Linear Transmission with the following settings:
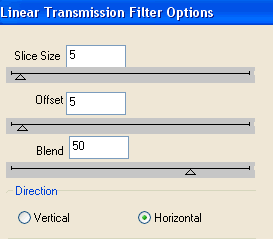
Lower opacity to around 80
Crop and resize to liking
Select Text Tool and font of choice
I am using Lucida Blackletter
Text colour black
Type out your text of choice
Objects > Align > Horizontal Centre in Canvas
Duplicate
Apply any effects and drop shadow of choice to top layer
Activate bottom copy
Effects > Distortion Effects > Wind with the following settings:
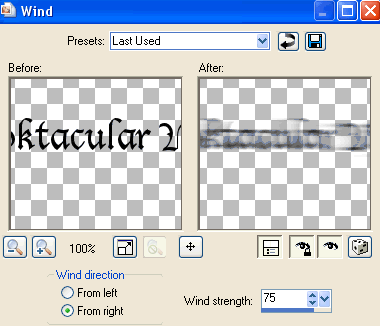
Then lower opacity to 50
Select another font of choice
I am using BakeScript
Text colour BLACK
Objects > Align > Horizontal Centre in Canvas
Convert to raster layer
Apply Gradient Glow and drop shadow of choice
Finally, add your © copyright, licence and watermark, then save as a GIF or JPG and you're done!
** IF YOU WISH TO ANIMATE PLEASE FOLLOW THESE NEXT STEPS **
Activate your Stars layer
Adjust > Brightness & Contrast
Brightness - 50
Contrast - 0
Now to animate - this animation is an easy one
Lower the opacity of the Stars layer to 50
Edit > Copy Merged
Open Animation Shop
Edit > Paste as New Animation
Now change the opacity of the Stars layer to 75
Edit > Copy Merged
Open Animation Shop
Edit > Paste as New Animation
Finally returning the opacity to 100
Edit > Copy Merged
Open Animation Shop
Edit > Paste as New Animation
Select all and change Frame Properties to 20
Now save as a GIF and you're done!
Thanks for trying my tutorial!
::st!na::
Here is a non-animated version:
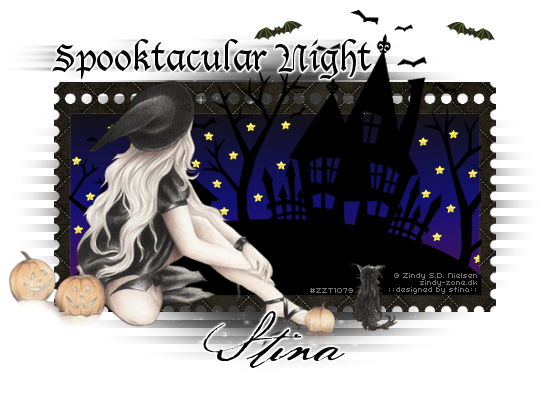
© Tutorial written by Stina on 15th September 2009
All rights reserved
Fonts of choice - I am using Lucida Blackletter and Liorah BT
Plugins: Xero > Improver and Radiance
dsb Flux > Linear Transmission
Let's begin...
Open a new 600 x 450 blank canvas flood-filled white
Paste Frame1 as new layer
Resize by 70%
Select inside the Frame with your Magic Wand
Selections > Modify > Expand by 10
Paste Paper of choice as new layer
Resize by 70%
Adjust > Blur > Gaussian Blur with a Radius of 10.00
Selections > Invert
Delete
Layers > Arrange > Move Down
KEEP SELECTED!!
Add a new raster layer
Open your Material Properties and select Gradient
Locate NGBlackBlue Gradient
Invert CHECKED

Flood fill layer with Gradient
Deselect
Lower opacity to around 55
Layers > Merge > Merge Down
Activate top layer
Paste SpookyHouse as new layer
Resize by 80% and position
Select inside of Frame once more
Selections > Invert
Use your Eraser to erase the excess from sides and bottom (leave top overhanging)

Deselect
Paste Moon as new layer
Resize by 20%
Position somewhere in the sky to your liking
Paste Star as new layer
Resize by 5%
Duplicate as many times as you like and scatter about the sky
Once you are happy with your amount, close off ALL layers EXCEPT for the Stars, then
Layers > Merge > Merge Visible
Unhide layers again
Paste Bat as new layer
Image > Rotate by 20 to the left
Resize by 12%
Dupliate, then Image > Mirror
Position above Frame to liking
Paste Tube of choice as new layer
Resize as necessary and position
Effects > Plugins > Xero > Improver with default settings
Duplicate
Effects > Plugins > Xero > Radiance with default settings
Lower opacity to around 25
Layers > Merge > Merge Down
Add new raster layer
Layers > Arrange > Send to Bottom
Flood fill black
Layers > New Mask Layer > From Image
Apply DBV_Mask_02
OK
Layers > Merge > Merge Group
Resize by 85%
Effects > Plugins > dsb Flux > Linear Transmission with the following settings:

Lower opacity to around 80
Crop and resize to liking
Select Text Tool and font of choice
I am using Lucida Blackletter
Text colour black
Type out your text of choice
Objects > Align > Horizontal Centre in Canvas
Duplicate
Apply any effects and drop shadow of choice to top layer
Activate bottom copy
Effects > Distortion Effects > Wind with the following settings:

Then lower opacity to 50
Select another font of choice
I am using BakeScript
Text colour BLACK
Objects > Align > Horizontal Centre in Canvas
Convert to raster layer
Apply Gradient Glow and drop shadow of choice
Finally, add your © copyright, licence and watermark, then save as a GIF or JPG and you're done!
** IF YOU WISH TO ANIMATE PLEASE FOLLOW THESE NEXT STEPS **
Activate your Stars layer
Adjust > Brightness & Contrast
Brightness - 50
Contrast - 0
Now to animate - this animation is an easy one
Lower the opacity of the Stars layer to 50
Edit > Copy Merged
Open Animation Shop
Edit > Paste as New Animation
Now change the opacity of the Stars layer to 75
Edit > Copy Merged
Open Animation Shop
Edit > Paste as New Animation
Finally returning the opacity to 100
Edit > Copy Merged
Open Animation Shop
Edit > Paste as New Animation
Select all and change Frame Properties to 20
Now save as a GIF and you're done!
Thanks for trying my tutorial!
::st!na::
Here is a non-animated version:

© Tutorial written by Stina on 15th September 2009
All rights reserved

No comments:
Post a Comment