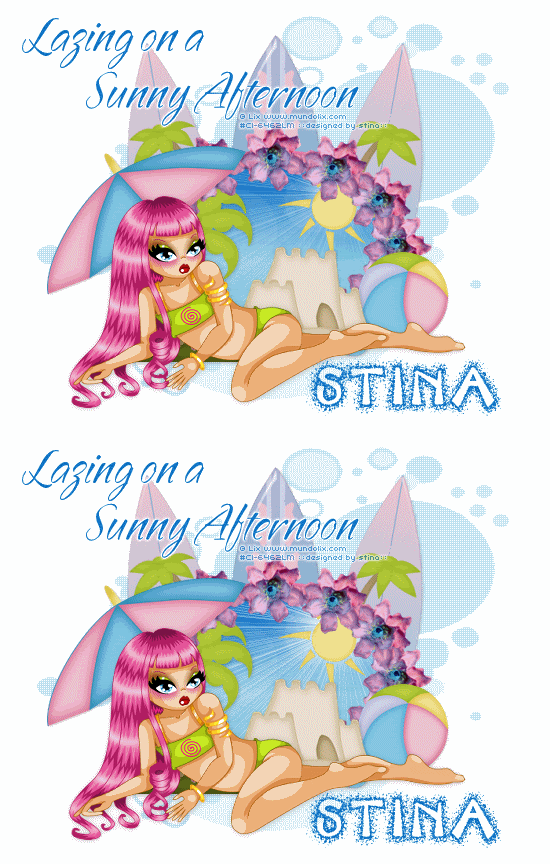
Supplies
Scrap kit of choice - I am using "Fun and Fancy Free" by Lynn Earwicker available from The Scrapping Divaz Designz
**PLEASE DO NOT USE THIS ARTWORK WITHOUT THE APPROPRIATE LICENCE**
UFMask19 here
Fonts of choice - SandyTextHmkBold and SBC Sandy Beach
Plugins: Filters Unlimited Blue Sky, Mura Meister Copies and Penta.com Colour Dot
Let's begin....
Open a new 700 x 550 canvas flood-filled white
Paste a Surfboard as new layer
Image > Rotate by 10 to the left
Resize by 70%
Position slightly to the left
Duplicate, then Image > Mirror
Image > Rotate by 10 to the left
Resize by 70%
Position slightly to the left
Duplicate, then Image > Mirror
Paste another Surfboard as new layer
Resize by 70%
Position in centre
Resize by 70%
Position in centre
Select your Preset Shape Tool and set to Ellipse
Foreground - colour to match tag
Background - null
Stroke width - 10.00
Foreground - colour to match tag
Background - null
Stroke width - 10.00
Draw out Ellipse towards centre
Objects > Align > Horizontal Centre in Canvas
Objects > Align > Horizontal Centre in Canvas
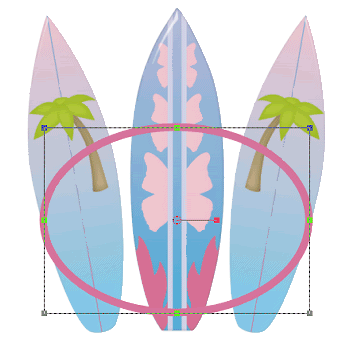
Convert to raster layer
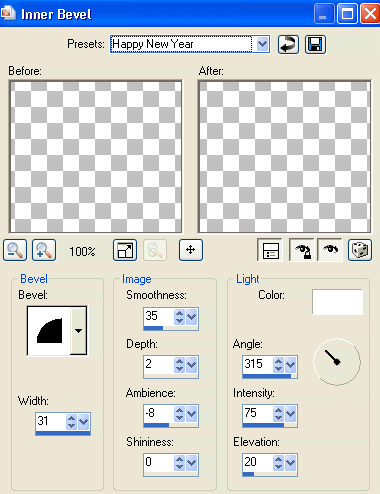
Apply the following Inner Bevel:
Select inside with your Magic Wand
Selections > Modify > Expand by 5
Add new raster layer
Paste Paper of choice INTO selection
Selections > Modify > Expand by 5
Add new raster layer
Paste Paper of choice INTO selection
KEEP SELECTED!!
Effects > Plugins > IC Net Software > Filters Unlimited > Color Filters > Blue Sky
Default settings
Deselect
Default settings
Deselect
Layers > Arrange > Move Down
Activate top layer
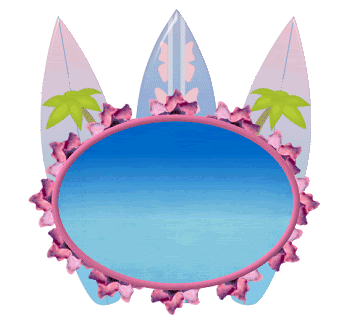
Paste Flower as new layer
Resize by 15%
Resize by 15%
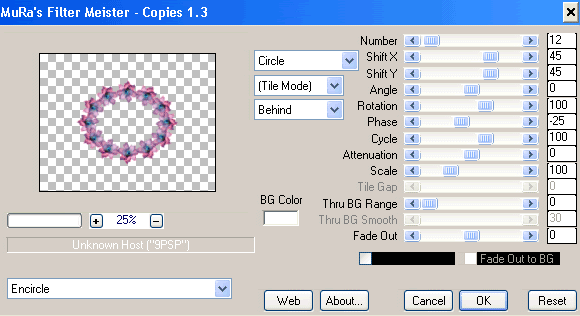
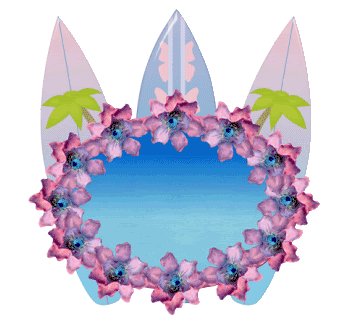
Effects > Plugins > Mura Meister > Copies with the following settings:
Position in line with Frame
Place over or behind Frame - it's up to you
Place over or behind Frame - it's up to you
Paste Tube of choice as new layer
Resize as necessary
Position along bottom of Ellipse Frame to your liking
Resize as necessary
Position along bottom of Ellipse Frame to your liking
Paste BeachBall as new layer
Resize by 20% and position
Resize by 20% and position
Paste Sandcastle as new layer
Resize by 40% and position
Resize by 40% and position
Paste Umbrella as new layer
Resize by 45% and position behind your Tube
Resize by 45% and position behind your Tube
Paste PalmTree as new layer
Resize by 40% and position behind Tube and Umbrella
Resize by 40% and position behind Tube and Umbrella
Paste Sun as new layer
Resize by 25% and position to liking
Resize by 25% and position to liking
Add any other elements to your liking
Paste Paper of choice a new layer
Layers > Arrange > Send to Bottom
Layers > Arrange > Send to Bottom
Layers > New Mask Layer > From Image
Apply UFMask19
OK
Layers > Merge > Merge Group
Apply UFMask19
OK
Layers > Merge > Merge Group
Crop and resize
Still on Mask layer
Effects > Plugins > Penta.com > Colour Dot
Default settings
Default settings
Lower opacity to 55
Select Text Tool and font of choice
I am using SandyTextHmkBold
Text colour of choice - I am using #0e74c7
I am using SandyTextHmkBold
Text colour of choice - I am using #0e74c7
Type out text of choice and position
Convert to raster layer
Apply a slight Gradient Glow and/or drop shadow of choice
Convert to raster layer
Apply a slight Gradient Glow and/or drop shadow of choice
Select another font of choice
I am using SBC Sandy Beach
Same Text colour
I am using SBC Sandy Beach
Same Text colour
Type out your name and position
Convert to raster layer
Apply any effect or drop shadows as necessary to your liking
Convert to raster layer
Apply any effect or drop shadows as necessary to your liking
Finally, add your © copyright, licence and watermark, then save as a GIF or JPG and you're done!
** IF YOU WISH TO ANIMATE PLEASE FOLLOW THESE NEXT STEPS **
Activate your Frame Background layer
Duplicate once and rename Sunburst1 and Sunburst2
Duplicate once and rename Sunburst1 and Sunburst2
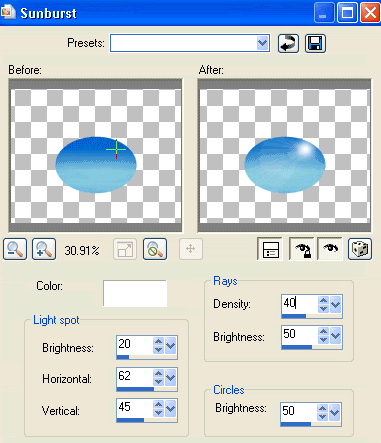
Activate Sunburst1
Effects > Illumination Effects > Sunburst with the following settings:
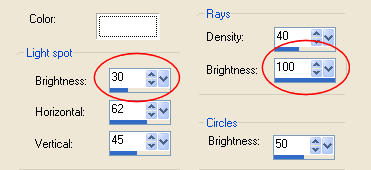
Hide Sunburst1 and activate Sunburst2
Apply Sunburst effect again with the following changes:
Apply Sunburst effect again with the following changes:
Now for the animation!
Activate Sunburst1 and hide Sunburst2
Edit > Copy Merged
Edit > Copy Merged
Open Animation Shop
Edit > Paste as New Animation
Edit > Paste as New Animation
Back to PSP
Hide Sunburst1 and activate Sunburst2
Edit > Copy Merged
Hide Sunburst1 and activate Sunburst2
Edit > Copy Merged
In Animation Shop
Edit > Paste AFTER Current Frame
Edit > Paste AFTER Current Frame
Select All and set your Frame Properties to 50
Save as a GIF and you're done!
Save as a GIF and you're done!
Thanks for trying my tutorial!
::st!na::
Here is a non-animated version:
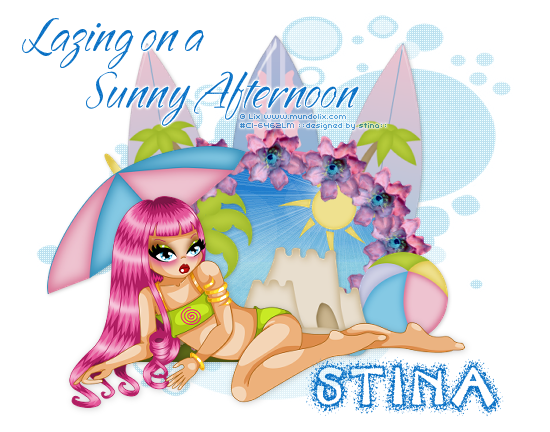
© Tutorial written by Stina on 4thJuly 2009
All rights reserved

No comments:
Post a Comment