Supplies
Scrap kit of choice - I am using "At the Pond" by Brandi of Grunge and Glitter Scraps as part of the Starving Artists Collab available from Totally Sweet Designs and Stargazer Scraps
Tubes of choice - I am using the wonderful artwork of Suzanne Woolcott available from her store
Template #24 by Yvette available from her blog
WSL_Mask239 by Chelle available from her blog
Font of choice - I am using AKApprique Black
Plugins: Colour Rave Atmospheriser, Eye Candy 4000 Gradient Glow and HSB Noise
Let's begin....
Open Template #24 by Yvette
Shift D to duplicate and close off original
Shift D to duplicate and close off original
Image > Canvas Resize 750 x 500
Select LargeRectangles with your Magic Wand
Selections > Modify > Feather by 2
Press delete a couple of times to remove greyed area
Paste Paper of choice INTO selection
Deselect
Selections > Modify > Feather by 2
Press delete a couple of times to remove greyed area
Paste Paper of choice INTO selection
Deselect
Select SmallRectangles with Magic Wand
Selections > Modify > Contract by 8
Press delete once
Selections > Modify > Contract by 8
Press delete once
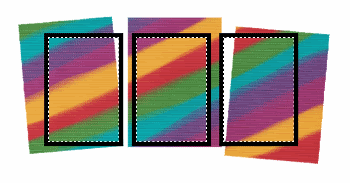
Add a new raster layer
Paste another Paper of choice INTO selection
Deselect
Layers > Arrange > Move Down
Paste another Paper of choice INTO selection
Deselect
Layers > Arrange > Move Down
Paste Rainbow as new layer
Resize by 40%
Position within two Frames
Resize by 40%
Position within two Frames
Paste Cloud as new layer
Resize by 35%
Position to your liking
Resize by 35%
Position to your liking
Paste Sun as new layer
Resize by 40%
Position behind Cloud
Resize by 40%
Position behind Cloud
Paste Raindrops as new layer
Resize by 30%
Position under the cloud
Resize by 30%
Position under the cloud
Paste Pond as new layer
Resize by 32%
Position at the base of two Frames
Resize by 32%
Position at the base of two Frames
Paste Foliage as new layer
Resize by 35%
Position to the lower left
Resize by 35%
Position to the lower left
Duplicate, then Image > Mirror
Position on opposite side
Position on opposite side
Paste a Frog as new layer
Resize by 15%
Position at the Pond
Resize by 15%
Position at the Pond
Paste Mushroom as new layer
Resize by 15%
Position to liking
Resize by 15%
Position to liking
Paste Turtle as new layer
Resize by 18% and position
Resize by 18% and position
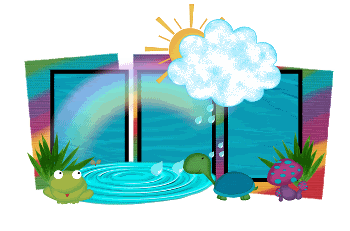
Paste three tubes of choice as new layers
Resize each as necessary and position within Frames to your liking
Resize each as necessary and position within Frames to your liking
Duplicate each Tube layer and apply the following Plugin to each layer
Effects > Plugins > Colour Rave > Atmospherizer with the following settings:
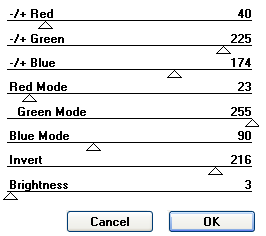
Lower opacity to around 40 (depending on your tubes)
Add any other elements you wish and apply any drop shadows of choice
Paste Paper of choice as new layer
Layers > Arrange > Send to Bottom
Layers > Arrange > Send to Bottom
Layers > New Mask Layer > From Image
Apply WSL_Mask239
OK
Layers > Merge > Merge Group
Lower opacity to 30
Apply WSL_Mask239
OK
Layers > Merge > Merge Group
Lower opacity to 30
Crop and resize
Select your Text Tool and font of choice
I am using AKAppriqueBlack
Text colour of choice - I am using on of the papers
I am using AKAppriqueBlack
Text colour of choice - I am using on of the papers
Type out your name
Objects > Align > Horizontal Centre in Canvas
Convert to raster layer
Apply a Gradient Glow and drop shadow of choice
Objects > Align > Horizontal Centre in Canvas
Convert to raster layer
Apply a Gradient Glow and drop shadow of choice
Finally, add your © copyright, licence and watermark, then save as a GIF or JPG and you're done!
** IF YOU WISH TO ANIMATE PLEASE FOLLOW THESE NEXT STEPS **
Activate your Pond layer
Duplicate twice and rename Water1, Water2 and Water3
Duplicate twice and rename Water1, Water2 and Water3
Activate Water1 and hide Water2 and Water3
Effects > Plugins > Eye Candy 4000 > HSB Noise with the following settings:
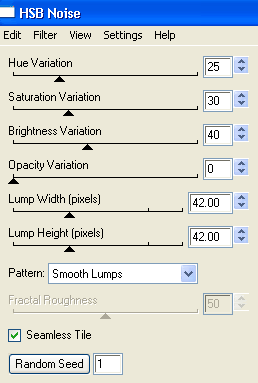
Hide Water1 and activate Water2
Repeat HSB Noise again adjusting the Random Seed
Repeat HSB Noise again adjusting the Random Seed
Hide Water2 and activate Water3
Repeat HSB Noise once again, adjusting the Random Seed
Repeat HSB Noise once again, adjusting the Random Seed
Activate Water1 and hide Water2 and Water3
Edit > Copy Merged
Edit > Copy Merged
Open Animation Shop
Edit > Paste as New Animation
Edit > Paste as New Animation
Back to PSP
Hide Water1 and activate Water2
Edit > Copy Merged
Hide Water1 and activate Water2
Edit > Copy Merged
In Animation Shop
Edit > Paste after Current Frame
Edit > Paste after Current Frame
Back to PSP
Hide Water2 and activate Water3
Edit > Copy Merged
Hide Water2 and activate Water3
Edit > Copy Merged
In Animation Shop
Edit > Paste after Current Frame
Edit > Paste after Current Frame
Select all and set Frame Properties to 50
Now save as a GIF and you're done!
Now save as a GIF and you're done!
Thanks for trying my tutorial!
::st!na::
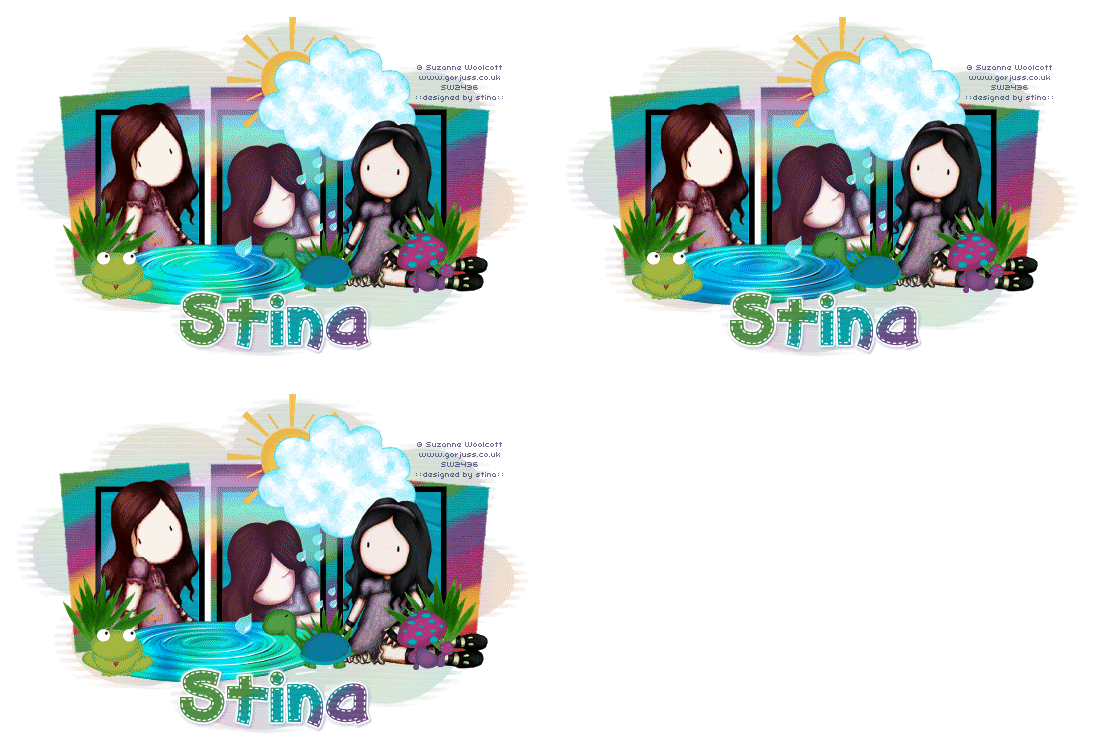
Here is a non-animated version:
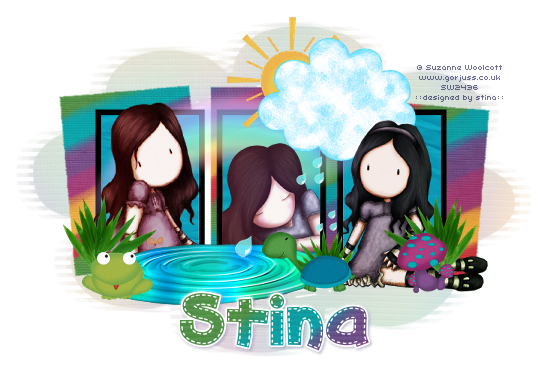
© Tutorial written by Stina on 9th July 2009
All rights reserved
All rights reserved

No comments:
Post a Comment