
Supplies
Scrap kit of choice - I am using "Dark Nights" by Missy Lynn Scraps available from Totally Sweet Designs, Scraps with Attitude, Paradise 4 Scrappers and Katelynn Designs
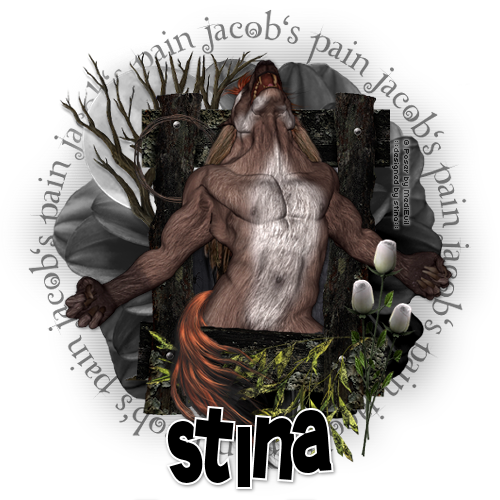
Tube of choice - I am using one of the Jacob Black Poser tubes from the Twilight Collection by MediEvil available from Twilight Scraps
Fonts of choice - I am using LDTwylight and TangledUp
Plugin: PhotoEffex Scanlines
Let's begin...
Open a new 700 x 600 blank canvas flood-filled white
Paste Flower7 (black flower) as new layer
DO NOT RESIZE!
DO NOT RESIZE!
Paste Frame6 as new layer
Resize by 70%
Resize by 70%
Select inside Frame6 with your Magic Wand
Selections > Modify > Expand by 15
Add new raster layer
Layers > Arrange > Move Down
Paste paper of choice INTO selection
Deselect
Selections > Modify > Expand by 15
Add new raster layer
Layers > Arrange > Move Down
Paste paper of choice INTO selection
Deselect
Duplicate
Adjust > Hue & Saturation > Colourisie
Set both to 0
Lower opacity 70
Adjust > Hue & Saturation > Colourisie
Set both to 0
Lower opacity 70
Back to top layer
Paste Flower2 (leaves) as new layer
Resize by 55%
Position along bottom of Frame
Resize by 55%
Position along bottom of Frame
Paste Frame7 as new layer
Resize by 20%
Position in upper left
Resize by 20%
Position in upper left
Paste Tube of choice as new layer
I am using one of MediEvil's posers from her Twilight Saga
Resize and position to your liking
I am using one of MediEvil's posers from her Twilight Saga
Resize and position to your liking
Activate your Frame and select inside with your Magic Wand
Selections > Modify > Contract by 2
Selections > Modify > Feather by 2
Selections > Invert
Selections > Modify > Contract by 2
Selections > Modify > Feather by 2
Selections > Invert
Now carefully erase the lower part of your Tube, decreasing the shape size and hardness to your liking to erase extra detail
Paste Rose16 (supplied) as new layer
Image > Mirror
Image > Rotate by 30 to the left
Resize by 80%
Position to the lower right
Image > Mirror
Image > Rotate by 30 to the left
Resize by 80%
Position to the lower right
Paste Rose18 (supplied) as new layer
Resize by 80%
Position alongside first rose
Resize by 80%
Position alongside first rose
Duplicate, then Image > Mirror
Image > Rotate by 15 to the right
Resize by 90% and position
Image > Rotate by 15 to the right
Resize by 90% and position
Paste Moon as new layer
Resize by 60%
Move down below Frame layer to the upper left
Duplicate, then set blend mode to Screen
Resize by 60%
Move down below Frame layer to the upper left
Duplicate, then set blend mode to Screen
Paste Tree as new layer
Resize by 70%
Position in front of Moon protruding to the left
Resize by 70%
Position in front of Moon protruding to the left
Crop and resize to your liking
Activate BlackFlower (background) layer
Duplicate
Resize by 110%
Adjust > Blur > Gaussian Blur with a Radius of 20.00
Duplicate
Resize by 110%
Adjust > Blur > Gaussian Blur with a Radius of 20.00
Effects > Plugins > Photo Effex > Scanlines with default settings
Repeat
Lower opacity to 35
Repeat
Lower opacity to 35
Select your Preset Shape Tool and set to Ellipse
Stroke width - 1.00
Foreground - #000000
Background - null
Stroke width - 1.00
Foreground - #000000
Background - null
Hold your shift key and draw out a circle around your tag
Objects > Align > Centre in Canvas
Objects > Align > Centre in Canvas
Select your Text Tool and font of choice
I am using LDTwylight
Type out text of your choice or use the template I've provided made by me
I am using LDTwylight
Type out text of your choice or use the template I've provided made by me
In your Layer Palette open the vector layer and turn off the Ellipse
Convert to raster layer
Lower opacity to 50
Convert to raster layer
Lower opacity to 50
Back to top layer
Select another font of choice
I am using TangledUp
Foreground - #FFFFFF
Background - #000000
Stroke width - 2.00
I am using TangledUp
Foreground - #FFFFFF
Background - #000000
Stroke width - 2.00
Type out your name
Objects > Align > Horizontal Centre in Canvas
Convert to raster layer
Apply a drop shadow of choice
Objects > Align > Horizontal Centre in Canvas
Convert to raster layer
Apply a drop shadow of choice
Finally, add your © copyright, licence and watermark, then save as a GIF or JPG and you're done!
Thanks for trying my tutorial!
::st!na::
© Tutorial written by Stina on 27th July 2009
All rights reserved
No comments:
Post a Comment